|
|
The Flytier:
|
Story By: Mike
Flagg, aka "Mike MT"
Fly Designed By: Mark
Bauman
Finished Fly Tied By: Mike
Flagg
Mike's Home:
Kalispell, MT
E-mail: 6flaggs@in-tch.com |
Mike is a Holistic Healthcare Practitioner living,
working...and fishing in Kalispell,
Montana. |
The Fly:
Hook: Nymph or dry-fly hook
depending on presentation desired, sizes 8 to
18.
Thread: 3/0 or 6/0, depending on hook
size, color to match or contrast.
Trailing Shuck: 3 Peacock
herls extending approximately the length of the hook
shank.
Body: (As shown in the photo
below.) Measure a small bunch of deer hair about twice the
length of the hook shank (I like it 1.5x, but Mark tied it
2x). The bobbin should be at the rear of the shank with the
thread hanging through the midpoint between the hook point and
barb. Lay the hair along the top of the shank so that the
extra length and tips point forward and past the hook
eye. Cinch down the hair with a few thread wraps. Next, hold
back the tips briefly so you can wind the thread forward to the eye.
With the thread hanging just behind the eye, pull the hair forward
and over the eye again, and cinch down the hair with a few thread
wraps. Tied this way there should be a bouyant "bubble" of
deer hair between the two sets of thread wraps. The deer hair tips
should extend forward and be long enough to form a bullet
head.
Butt: To form the butt, simply cut the
butt ends off the deer hair so that it is a little rough.
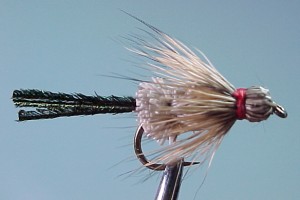
Peter's Note: This
photo and the one that follows below show my first attempt at
Mike's recipe, and is the reason
I forgot the peacock herl tail. Though a bit rough, the above shows the appearance of the body,
after the butt is
trimmed and before the bullet head is formed.
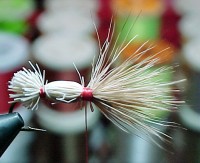
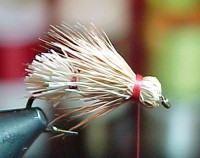
Head: Return the tying thread to the 1/4
point. Fold hair back and create a bullet head by tying the
hair down and finishing with a whip knot. I like to use an
attractor colored thread for this purpose, such as orange or red.
Some tiers like to coat the head with flexible cement to add
durability.
Additional
thoughts: The Whiz Kid can be
tied in any color imaginable. I've also tied some with rubber
legs, but haven't had a chance to fish them yet. The standard
imitation fished dry certainly looks like a caddis, but it can be
taken for an emerging mayfly, even a terrestrial. A small piece of
bright poly-yarn can be tied in for an indicator, if desired. Add a
split shot or two to your tippet and fish the Whiz Kid wet; it has a
beautiful pulsating "I'm alive, come eat me" movement that triggers
fish to feed. The sky is the limit on this one, so
experiment and have fun.
Fly origin: The Whiz Kid was the
brainchild of my friend, Mark Bauman of Whitefish, Montana. Sadly,
Mark passed away in September, 2002. His tying talent, fishing expertise, teaching patience, and
friendship will be sorely missed.
|
The Story:
|
"... I fished that one size 14 Whiz Kid
the entire day...." |
|
Very early one June morning a
couple years back I headed off to my favorite river. Really,
it's nothing more than a glorified stream, but the fishing
is great...and the solitude is even better.
I got to my favorite stretch, suited up, and
waited impatiently for daylight. I had decided before I left the
house that I would be use a new fly designed by my friend, Mark
Bauman, of Whitefish, MT. It was called the Whiz Kid. Mark told me
to use it in size 10, but I nevertheless tied one each of sizes 10
to 18...just in case.
As the sun came up, I could see fish working
the shallows. They must be on caddis emergers, I thought. Carefully
I tied on the middle-sized Whiz Kid, a size 14, and made my first
cast. Slowly, silently, and in what appeared slow motion, the 5x
tippet uncoiled and the fly landed ever so gently on an overhanging
bush. Sigh. Being my only size 14, I wasn't about to lose it on the
first cast of the day, so I waded over, undoubtedly putting down
every fish in the hole, and released the bush.
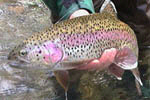
I promptly proceeded to the next hole hoping
the day would improve. It did. I released at least fifteen 14"-16"
rainbows (and only the one bush!) that day.
The amazing thing about the Whiz Kid is its
tremendous versatility. In the morning the fish were caught on the
surface; during the midday hours they were caught while stripping
the Whiz Kid near the bottom; and in the evening they hit it on the
swing or while being skated. I fished that one size 14 Whiz Kid the
entire day, and it was still in good shape when I went home! Now
that's what I call a killer fly!
-- Mike Flagg |
|
copyright © Notice by fishingwithflies.com.
All rights reserved. This
material is for your personal enjoyment. Please obtain prior
written permission from the author and fishingwithflies.com
before any other
use. |
| |