|
As a lifelong resident of the
Western suburbs of Boston, "Opening Day" conjures up images of Fenway Park and the Boston Red Sox, not fishing. That is because
since the late 1970s, Massachusetts has been one of those lucky
states with no opening day. Fly-fishing can be a year-round
activity!
But every year I do have a
"personal" Opening Day. This year’s goal was to get on (in!) the
water as soon as possible in March. Early on, because of the winter
draught, I thought a March outing would be a reasonable expectation.
But in addition to a lack of snow, New England suffered some record
cold weather. Each weekend in March I just shook my head, put
another log in the woodstove, and tied a few more
flies.
Then came the wettest April ever
recorded in Boston. I don’t mind fishing in the rain, but there is
something about the phrase "flood waters" that puts a damper on
things.
But finally, on the last Sunday
of the month, the stars were all aligned. The water level on the Nissitissit was reported by a friend to be reasonable. So I took the
plunge. I threw everything into the back of the van and headed
north.
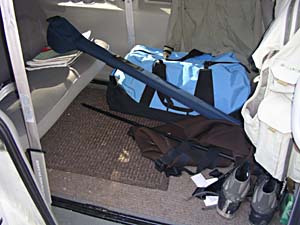
I am a big fan of mini-vans. This is my second.
Remove the middle seat and you have lots of room for changing
clothes,
storing stuff and eating lunch.
The Nissi looked promising. The
river was indeed wadeable, the water temperature was in the low 50s,
and the air temperature was in the 60s. A winning combination for my
personal Opening Day.
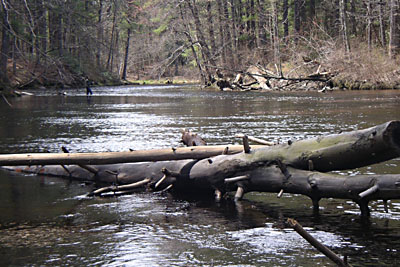
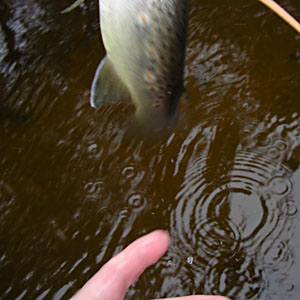
The Nissitissit offers some fine
early season fishing. The picture above is along the Fly Fishing
Only section. Looking upstream, one fisherman on the left is
standing in a riffle that empties into a deep pool on the near side
of the river. A similar riffle/pool combination lays just upstream
from him. It is in that uppermost section that I spent my first hour
of the season, and where my friend Alberto had caught a fat stocked
rainbow and a 16-inch brightly colored (holdover?) brown trout
between rainstorms the previous week. With a 5W sink-tip line and a
short leader I chucked lead-weighted flies and heavy beadheads into
the riffle and pool, but failed to repeat Alberto’s
success.
Having struck out, I got out of
the water and walked downstream to a sandy bank where I sat down to
warm up a bit in the sun. The water was moving fast but the surface
was smooth due to a bottom of sand and small black rocks. While I
stared at a few mayflies flying a few feet off the water, with
complete surprise I heard a fish slash at something quite noisily
near the far bank. After I located the ripples I heard another loud
noise one long-cast-away downstream. With hands trembling at
the thought of catching the season’s first trout, I dug into my vest
and pulled out my floating line, a new Cortland peach 444, and stung
it up being careful to enter the line through each eye. I knew the
leader was in good shape because the prior evening I put new ones on
each of my lines. I was pleased that I had had the foresight to
attach two feet of 5x tippet.
I had been so busy getting my
line rigged-up that I hadn’t done much insect-watching. I had seen
some size 12 gray mayflies (that’s the limit of my entomology
terminology). On the other hand, the violent slashing and sounds of
the trout attacking insects was a hint of caddis, although I did not
see any. So, I put on my standby, a size 12 Hare & Herl Bugger.
I thought I might pick up a fish by swinging it below the surface
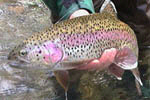
like a larger emerging insect. In a few casts I had my first of six
10"-12" brownies.
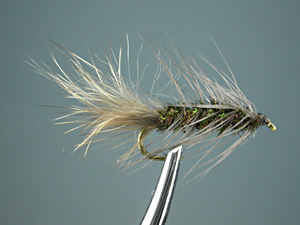
Click here
for step-by-step instructions of a favorite of mine, the Hare
& Herl Bugger.
(The image above is of the actual fly used to
catch that first fish, seen (sort of) below:
Whoops... slippery...I was hoping to get a good
picture of my first trout of the season!
By now I had actually seen a
few caddis, size 14 in gray/tan clothing, skimming across the
surface. I took the weighted bugger off the tippet and tied on a
size 10 orange soft-hackle. Though not of the same color as the
naturals, orange is a great attractor color. I hoped that a
downstream swing of this fly near the surface would entice a fish or
two.
Because there is no tail on this
classic soft hackle pattern, in my opinion you can use a slightly
bigger hook without making the fly too long. Casting down-and-across
near and between several sunken logs in the area of the rises, I
picked up two more browns in short order.
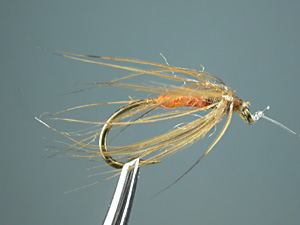
This image is of the actual fly used, complete with a
bit of snipped tippet.
Straight-forward design: Size 10 wet-fly
hook, brown thread, orange floss body,
bit of tan antron dubbing
for the thorax, and hen hackle collar
I feel rather inadequate as a dry
fly guy, but figured I had caught opening day fish already, so why
not give a dry fly a try? After all, my dry fly box was overstuffed
after a winter of tying. A size 14 deer hair caddis looked to be the
right size, though the ginger hackle I had used on this series and
the bleached deer hair created a brighter appearance than the
naturals I was seeing. Yet, I am also a believer that presentation,
shape and size are more important than color.
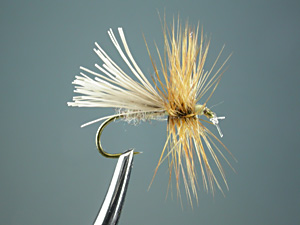
This is the actual fly. No worse for wear after three
trout.
Deer wing caddis: Gray dubbing, bleached coastal deer
hair wing (tip-tied),
ginger hackle accidentally oversized,
V-notch cut in the bottom
I have had success with this
style of caddis before, and it worked on this day as well. I managed
to bring to hand two more browns with upstream and across
casts. And the final brown of the afternoon fell to this fly at the
end of its drift, after I tugged it underwater and gently swept it
across the current.
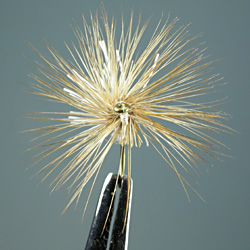
Frontal view: A bit asymetrical, but I guess the fish
didn't notice.
Note the V-shape cut in the
bottom
Within an hour of the start of this flurry
of activity, the wind picked up and all insects seemed to disappear.
I saw no more fish and the breeze began to chill my bones. It was
time to go home after a short fishing day. But I had singles and
doubles with my fly selection and I was all
smiles.
A note
about the Deer Hair Caddis shown above: The wing on this version is tied in by the hair
tips, not the butts. That explains the blunt ends you see in the
photo. This is not an original idea. Readers of
The Fly
Tier’s Benchside Reference (Copyright in 1998 by Ted
Leeson and Jim Schollmeyer) will find this technique described on
pages 312-313.
Perhaps not appealing to the eye of
the fisherman, this tying technique results in less build-up
at the tie-in point because the deer hair tips are thin. Also, the
more buoyant part of the hair (the hollow end) is at the rear of
the fly, where it can help support the heavy end of the hook.
Scissors are used to trim the wing to the desired length and an
appropriate shape.
--Peter
Frailey
|