|
Flies With a Story #60: Read and see
Bob's variation of this classic pattern
The
Flytier:
|
"Capn' Bob" Jones of Idaho Falls, Idaho |
|
Also known as
“Capn’ Bob” on fly fishing
bulletin boards, I am 58 years old and, except for a stint in a far off
land overseas and a couple of years in the highlands of
Virginia, I have lived in southeastern Idaho most of my life. For 35 years I have been an electrician by trade
(IBEW LU#449), working everything from large dams to nuclear
reactors and everything in-between. I’ve been married to my
wonderful wife for 34 years. I’m a devout fly fisherman and
have been tying flies for 10 years. I tie mostly for
myself, gifts, raffles and occasional fly swaps. My home
waters are the Henry’s Fork and the South Fork of the Snake
River. I enjoy tying and fishing all kinds of flies for
trout, since that is what I fish for 100% of the time. When
I reach retirement, I plan on traveling around the country
and doing a lot of fishing. |
| Story by: |
"Capn' Bob" Jones |
| Flies tied by: |
Bob |
| Instructions by: |
Bob |
|
Email Bob at:
pflighfission@cableone.net |
|
 |
|
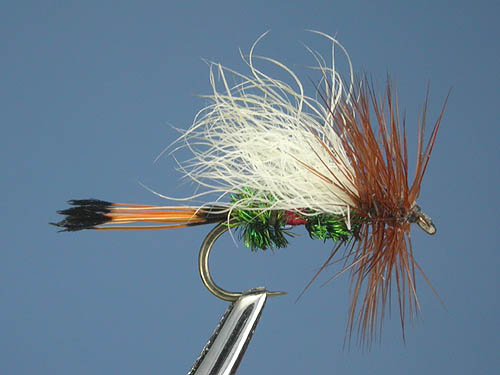
Hare-wing Royal Trude tied by Bob Jones.
Detailed instructions and tips follow the story below.
Photo by Peter Frailey |
Bob's variation of this old standard:
Hook: Dry fly hook,
"standard" size, #12 - #18 (i.e. *Mustad #94840)
Thread: 8/0 Uni-Thread, Black
Tail: Golden Pheasant tippets
Body: Peacock herl-red floss-peacock
herl (Royal Coachman-style)
Wing: Snowshoe hare's foot hair from
the bottom of the heel area, cream or lighter colored, tied
Trude-style or down wing
Hackle: Reddish brown neck or saddle
hackle
|
To rib or not to rib:
You can rib the fly with fine gold
wire as an option (traditional), as in the "Royal
Coachman", but I don't think it makes any difference on
the smaller sizes and I usually omit it. |
The Story:
|
The Hare-wing Royal
Trude |
Original Recipe:
Tail: None
Body: Reddish rug yarn
Wing: Reddish
flank hair from a spaniel
Hackle: Two reddish brown neck or
saddle hackles
|
|
In the early 1900s, in Island Park, Idaho,
Carter Harrison created the "Trude" fly as a joke for his
friend and fishing host A. S. Trude. The original
ingredients are listed in the sidebar on the left.
The fly certainly has evolved
since his original pattern! The first pattern was tied
without a tail. Today, it is most often tied with a tail, usually made from the barbs of a golden
pheasant tippet feather.
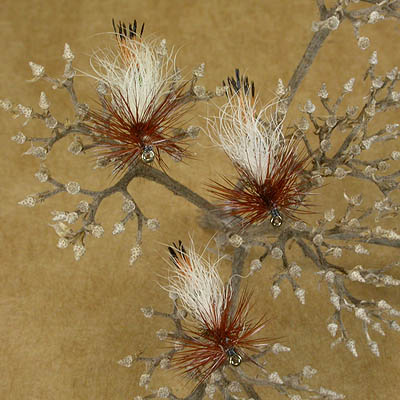 |
Several
"hare-wing" Royal Trudes tied by Bob Jones. Photo
by Peter Frailey
Harrison's biggest contribution to the future
of western fly tying is the "down-wing" or "Trude" style,
with the hair wing characteristically slanted back across
the body. Today, the Trude style
of wing is as recognizable as the "Royal Coachman" body.
The Trude fly has expanded into many different
configurations. My favorite is the "Royal Trude", which
combines the main characteristics of both the Royal Coachman
and the Trude. (A similar pattern is called the
“Wright’s Royal”, originated by Phil Wright. Both are
identical except that Wright's fly omits the tail.)
Commercial Trudes are generally made
with white calftail, which is highly visible to the fisherman
in rough water. But, for the wings of my smaller sizes
(#12 and smaller) I have taken to using the fur from the
bottom of the foot of a snowshoe hare. I particularly
like the hair from the heel area. The natural cream color foot-fur
is nearly as visible as white calf tail, but has the
advantage of providing additional buoyancy. The structure of
the hair makes it float like a cork without adding floatant.
On the right, Peter has photographed several of my
"hare-wing" Royal Trudes.
Fish this fly as you would any
other attractor pattern. It’s a killer on pocket water, in
the riffles, dead drifted along an undercut bank. Tie some
up and give them a try!
-- "Capn' Bob" Jones |
Detailed Instruction:
Hook: Select a hook,
flatten the barb and place the hook in the vice.
|
Hook length: Most tiers like to tie their “Royal” style of body using
a 1XL or longer hook to facilitate the tying of the
peacock-floss-peacock sequence, while still leaving room
for the wing, hackle and head. The samples in the
photographs are tied on the “standard” length hook,
which I prefer for this pattern. |
Thread: Start the
thread at the middle of the hook shank and
wrap it to the rear of the hook in even touching
wraps to a position just above the hook barb. Let the
bobbin hang.
|
Tip: If you select a tippet feather
having the distance between the two black bands
equal to the shank length, all your tails on
flies for that hook size will be uniform.
Tippet feathers come in a variety of sizes and
matching them to the hook shank length makes for
nice, uniform tails on your flies.
|
Tippet Feather Tail:
Select a golden pheasant (GP) tippet feather with barb length
equal to the hook shank.
While holding the feather
between your left thumb and index finger at the second
black band, cut the feather barbs from the shaft of the
feather by angling your scissors, point toward the
feather shaft, at approximately 45 degree angle to the
shaft and make a cut through the base of the barbs,
pulling the desired number of barbs loose.
Pinch the GP barbs
together and position them on top of the hook. Tie
in at the second black band right where the thread and
bobbin are hanging. You may find the following tying
tips helpful.
|
The "Over,
Under, Over" Technique:
After tying in the tail barbs with a couple
of
thread wraps: (1) Lift the butts enough to
make a thread wrap between the shank and the
butts, (2) lower the butts and (3) make a
couple more wraps back over the tail. This "over, under, over"
techniques will lock the barbs in. |
|
Tip: I
sometimes put a drop of head cement on the
barbs where they are tied down, to
really bond the tail to itself and the shank. |
|
Peacock Herl:
The best herl for the coachman body is from just
below the eye of the feather. I like to select
them from the first 1/2” below the really
emerald green band of the eye. Notice the shape
of the peacock herl shaft. One side of the herl
shaft is more bulbous and has a glossy finish.
If you tie in the peacock herl so that the
glossy side is against the shaft, wrapping the
herl around the hook shank will result in an
evenly flared and uniform appearance. |
Body/First Herl
Segment: Tie in the peacock herl and trim off
the butt. Using your
fingers to grasp the herl, make 3 or 4 close, forward
wraps of the herl, keeping just enough tension on the
herl to keep from breaking it. Tie off the herl using
the "over, under, over" technique described in the
previous step. Let the thread bobbin hang and trim off
the herl butt (save for last 1/3 of body).
|
Tinsel Option:
I tie in a piece
of fine, silver or gold tinsel after tying in
the red floss, and wrap the hook shank
with the tinsel to create an underbody for the
floss. It hides the hook shank
and allows light to reflect back out through the red
floss. Without it, the red floss turns dark when the
fly gets wet. |
Body/Floss Segment:
Select a 2" length of single strand, red floss.
Always work with single strand floss for floss bodies,
even if it is necessary to separate a single strand from a
spool of 3 or 4 strand floss. Tie in the red floss,
locking it with the "over, under, over" technique. (See
sidebar for the tinsel option.) Let the bobbin hang and
trim off the tag. Wrap the floss foreword in even
touching turns to form a smooth body and tie off.
Body/Second Herl
Segment: Use the remainder of the herl that
you trimmed off from the first herl segment and tie it
in just forward of the floss. Take 3 or 4 even, forward wraps of the herl,
tie off as before and trim butt. Your herl segment
should end at the half-way point, exactly where you
started the thread.
|
Reverse Hackling:
Position the hackle feather, dull/concave side
facing up with the
tip pointing out over the eye. Make a couple of
loose wraps around the stem and hook shank.
Then, while holding the bobbin
directly above the wraps, apply tension on the
thread, taking up slack, and make one more wrap
over the feather stem. While keeping
tension on the thread, lock in the feather using
the "over, under, over" technique described
above. Trim off the feather stem
and continue wrapping the thread back to where
the peacock herl is tied off. |
Hackle Tie-in:
Select a reddish brown neck or saddle
hackle having a barb length about 1 ½ times the hook
gape width and tie it in about a hook-eye length behind
the eye of the hook, concave or dull side facing up.
I use the reverse hackling method for practically all of
my collar-hackled flies, wet or dry.
|
Snow Shoe Hare
Foot: This is a highly buoyant option to the
typical calf tail. Cut the fur from the heal
area and as close to the foot as possible while
pinching the clump with your thumb and index
finger and applying slight tension. Sometimes
you can just pull a clump out without cutting.
Clean out the under fur, which makes great
dubbing |
Wing: From a
light cream colored snowshoe hare’s foot, snip off a
small clump of fur for the wing. The tip of the wing
should align with the hook bend. Using the pinch method, tie in the wing with
a couple of loose wraps.
Apply upward tension
on the thread, tighten and make another wrap. While
still pinching and holding the fur wing in place, raise the hair butts and make a wrap under
the butts, then a wrap over the butts (again, the "over,
under, over" binding technique).
Additional wraps should
be made "through" the butt. First, raise a few
strands and make a wrap in front of the strands.
Then, raise
a few more strands and make another wrap in front. Trim
hair butts and, while holding the hair wing in position,
make some tight wraps over the hair butts and wrap back
to the beginning of the wing. Tie off with a two or
three wrap whip finish. Let the bobbin hang.
|
Tip:
Here’s another good place to add a drop of
head cement. Place a drop on top of the
hair butts. It will soak in and bond the
wing in. |
Hackle Tie-off:
Wrap the hackle and tie-off behind the eye.
|
Reverse Hackling
Technique: Hold the feather by the tip with
your fingers or hackle pliers. Apply
tension straight up above the tie-in spot
and wrap it back in even turns to where the
bobbin is hanging. While holding tension on
the hackle feather, make a tight wrap of
thread over the feather, trapping it. Now,
begin wrapping the thread in open, spiral
turns toward the eye, weaving it through the
hackle barbs by wiggling the thread
back-and-forth through the barbs while
wrapping. When you end up back behind the
eye of the hook, tie off. Snip off the
remaining feather while being careful not to
snip off the hackle. |
Finishing Touches:
Build a small, neat head, tie off with a whip finish,
trim thread and apply head cement. |
|
copyright © Notice by fishingwithflies.com.
All rights reserved. This
material is for your personal enjoyment. Please obtain prior
written permission from the author and fishingwithflies.com
before any other
use. |
|