Tying Sequence:
|
Hook:
Mustad
94831,
Daiichi
1280,
TMC 5212
or any
3X long
streamer
hook
Thread:
Uni-Thread
6/0
Body:
Single
length
of
Rainy’s
Float
Foam
Rear
Legs:
Round
rubber,
4
strands
for
top
of
kicker
legs,
knotted,
then
cut
to 2
strands
for
lower
kickers
Front
Legs:
Round
rubber,
double
strands
Thorax:
Soft
dubbing
Wing:
Mottled
hen
back
feather,
lacquered
Antennae:
Stiff
fibers
or
hairs
(I
use
bristles
from
old
paint
brushes)
Eyes:
Black
half
beads
or
melted
mono,
size
to
match
natural
Markings:
Permanent
Pen
|
Tying Directions
from Bill:
Wrap a smooth thread
base along hook
shank leaving space
at both front and
back of hook.
Remove thread. Cut a
length of Float Foam
slightly longer than
hook shank. Make a
slit in foam half
the total foam
depth. Cover thread
wraps with a light
coat of Zap-A-Gap
and push foam down
over hook shank into
slit.
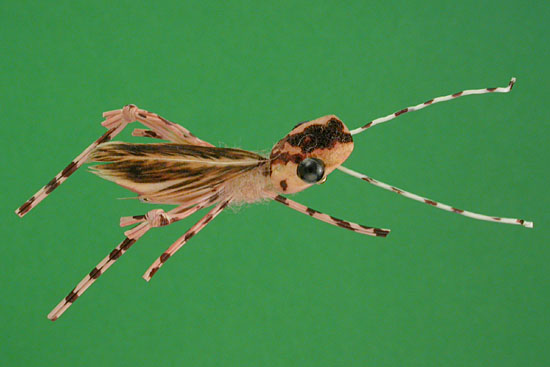
Attach thread at
rear of head and
wrap down Float Foam
tightly over about ¼
of total hook shank
length. (This is
the area covered
with dubbing in the
second image above.)
The thread wraps
will form a tight
waist and provide a
base for attaching
the legs.
Trim front of head
and rear of abdomen
at 45-degree
angles.
Cut two lengths of
round rubber legs
with four attached
strands and make an
overhand knot.
Apply a drop of
Zap-A-Gap to knot
and allow to dry.
When dry, separate
the four strands
below the knot down
to 2 strands using a
bodkin and cut off 2
strands. This makes
a fat upper and a
slim lower kicker
leg. Attach kickers
on each side of
abdomen with several
wraps of thread so
that the legs extend
rearward.
Cut two lengths of
rubber legging two
strands wide and
attach in X fashion
in front of kicker
legs.
Lightly dub the
tying thread with a
fine dubbing and
wrap over the tie in
points for the legs
concealing the
thread.
Attach the lacquered
wing in front of the
legs and cover the
tie in with
additional dubbing.
Apply a fine coat of
Zap-A-Gap to abdomen
and press wing into
it cementing the
wing to abdomen.
Whip-finish the
thread at back of
the head and apply a
drop of Zap-A-Gap to
final wraps pulling
them into the
dubbing and remove
thread.
Using a fine needle,
insert one antenna
into the eye of the
needle and push the
needle thru the back
of the head at an
angle out the front
of the head. Slide
needle off antenna
and apply a small
drop of Zap-A-Gap to
the back end of
antenna and pull
into foam (careful,
don’t pull the
antenna all the way
out the front).
Repeat on other
side.
Zap-A-Gap an eye to
each side of head
using beads or run a
length of mono thru
the head at eye
positions using a
needle. Remove
needle and melt the
mono ends to form
the eyes on each
side. I don’t
recommend using a
lighter to do this
as the foam has a
low combustion
temperature.
Using a permanent
marker pen (Pantone
or Sharpie), mark
the legs, antennae
and head of the
hopper.
By tying in the legs
tightly to the
compressed foam, you
will get a nice
“splayed” leg effect
for the kicker
legs. The flexible
rubber legs wiggle
when the hopper is
twitched on
retrieve. The high
floating nature and
silhouette of this
hopper, coupled with
the wiggling legs,
causes some violent
strikes. Try this
pattern in black
too.